Retrieve data based on campaign history and/or status.
Table( CampaignSelection ( Syntax Component) , [Table Level] )
-
Syntax Component defines the campaign history data to be applied to the expression, see below for components
-
Users can insert multiple campaign components to build the expression, e.g. specific campaign IDs, partial name searches, campaigns within a certain date range
-
-
Table Level selects the level to which data is rolled, e.g. individual, household, etc.
Components
| Component Type | Component | Description | Example |
|---|---|---|---|
| General History | CampaignLevel | Select the data level the campaigns are on (e.g. Individual). Also used to create a selection not specific to a certain campaign. | CampaignLevel = 53 |
| Specific Campaign Selection | ThruCampaignID | Select records that have passed through a specific Campaign, by ID | ThruCampaignID = 1214 |
| OnCampaignID | Select records that are currently waiting on a specific campaign, by ID | OnCampaignID = 1214 | |
| ThruCampaignName | Select records that have passed through a specific Campaign, by Name | ThruCampaignName = 'Welcome Campaign' | |
| OnCampaignName | Select records that are currently waiting on a specific campaign, by name | OnCampaignName = 'Welcome Campaign' | |
| Date Selection | StepDate | Select records that have passed through a specific step on a set date/time | StepDate >= '2017-08-20' |
| Specific Step Selection | StepType | Select records that have passed through this specific step type (e.g. a communication) | StepType = 'communication'StepType = 3 |
| ThruStepID | Selects records that have passed through this specific step by ID | ThruStepID = 10 | |
| OnStepID | Selects records currently waiting on a specific step by ID | OnStepID = 10 | |
| Response Types Selection | ResponseType | Selects contacts who have a response record to a campaign output (e.g. a click) |
ResponseType = 'Click' ResponseType = 2 |
| Outputs via a specific Channel | ChannelCode | Selects contacts who have been output by a specific channel type (e.g. Adestra) | ChannelCode = 12 |
| Custom Code Selection | StepCode1 | Select records output with a value from CustomCode1 | StepCode1 = 3 |
| StepCode2 | Select records output with a value from CustomCode2 | StepCode2 = 3 | |
| StepCode3 | Select records output with a value from CustomCode3 | StepCode3 = 4 | |
| StepCode4 | Select records output with a value from CustomCode4 | StepCode4 = 4 | |
| StepCode5 | Select records output with a value from CustomCode5 | StepCode5 = 5 | |
| Control Groups | isControl1 | Selects records flagged as Control Group 1 | isControl1 = TRUE |
| isControl2 | Selects records flagged as Control Group 2 | isControl2 = TRUE | |
| isControl3 | Selects records flagged as Control Group 3 | isControl3 = TRUE | |
| isControl4 | Selects records flagged as Control Group 4 | isControl4 = TRUE | |
| Event Selection | isSeed | Selects seed records within a campaign | isSeed = TRUE |
| isTrial | Selects records that went through a campaign Trial run | isTrial = TRUE | |
| isExited | Selects records that have left/exited a campaign | isExited = TRUE | |
| isImplied | Selects records fed through an Implied audience node | isImplied = TRUE |
Example: Select all individuals who have been sent a campaign in the last week
Table( CampaignSelection( CampaignLevel = 53 and Steptype = 'communication' and TIMESTAMPDIFF(SQL_TSI_DAY, StepDate , currenttimestamp) <= 7 ) , [Individual] )
Example: Select all individuals who have ran through a Survey email (id 1214) on or after 1st June 2017
Table( CampaignSelection( ThruCampaignID = 1214 AND StepDate >= '2017-06-01' ) , [Individual] )
Example: Select all households who are currently waiting on our Up-sell Postal Campaign, on a Wait Step
Table( CampaignSelection( OnCampaignName = 'UpSell Postal' AND StepType = 8 ) , [Household] )
Campaign history selections are often not specific to a particular campaign or behaviour. These are focused on selecting or flagging anyone who has been through 'any' campaign within a set timeframe, usually for a campaign suppression. For example, you may want to select everyone who has been sent 2 or more campaigns in the last week.
To do this, first you need to set your Campaign Table level, using the function 'CampaignLevel'.
Each Campaign Level will have it's own ID, found on the Editor Tab when creating a blank campaign selection, as below.
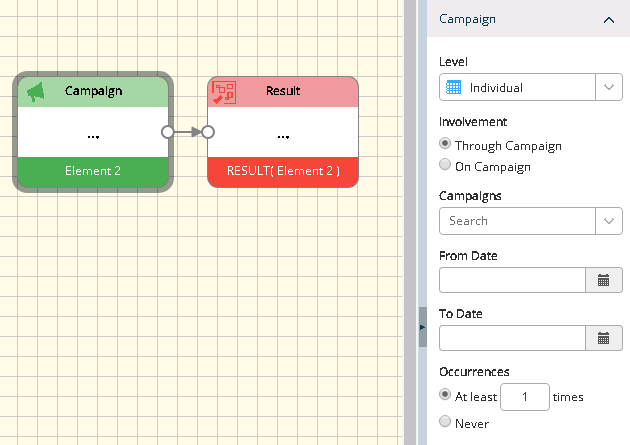

As shown above, the CampaignLevel for the Individual Table is '53'. This selection counts how many times each individual appears on this CampaignLevel, and returns everyone who has appeared more than once.
This is unique to each system, so use steps above to find out your level. Using this information, you can build up your selection, using the criteria above to refine the selection.
For example, to select everyone who has been sent an email (Communication Step) more than 3 times within the last fortnight, your selection could look like this:

In this example, there are 3 core campaign selection elements:
- CampaignLevel
- StepType as 3 (Communications)
- TIMESTAMPDIFF function (to select all steps within the last 14 days)

Once these are all calculated, the system will COUNT() how many times an individual links to this behaviour. If an individual has more than 3 events which match our criteria, they are selected.
This can now be used as a Suppression rule, to suppress anyone who has received more than 3 campaigns in the last rolling 14 days.
Specific Campaign Selection
Some campaign selections may focus on selecting people who have received, or are currently receiving, communications from a specific campaign. There are 4 options for doing this:
Example: Use ThruCampaignName to select anyone who has processed through and Exited a campaign, determined by the campaign name.
Table( CampaignSelection( ThruCampaignName = 'My Welcome Campaign' ) , [Individual] )
Example: Use OnCampaignName to select anyone who is currently waiting on or pending exiting a specific campaign, determined by the campaign name.
Table( CampaignSelection( OnCampaignName = 'My Welcome Campaign' ) , [Individual] )
Example: Use ThruCampaignID to select anyone who has processed through and Exited a campaign, determined by the campaign ID
Table( CampaignSelection( ThruCampaignID = 1214 ) , [Individual] )
Example: Use OnCampaignID to select anyone who is currently waiting on or pending exiting a specific campaign, determined by the campaign ID
Table( CampaignSelection( OnCampaignID = 1214 ) , [Individual] )
Using Date Ranges in Selections
One important selection for campaign history is to define the date range your campaign history query will look at. This is important for a number of reasons, foremost to ensure any records you're looking at or excluding have been communicated within your required date range.
Use the component "StepDate" to select your campaign dates. When using the StepDate component use the following formats:
- Use YYYY-MM-DD for a date
- Use YYYY-MM-DD HH:mm:SS for a date and time. ('2017-02-23 14:30:01' would select after 2:30pm on 23rd Feb 2017)
- If you don't specify a time, it defaults to Midnight of your date.('2017-06-15' will translate to 15/06/2017 00:00:01.)
The selection criteria of " StepDate > '2017-06-15' "selects everyone who received after midnight on the 15th, so anyone who received a 9am campaign on 15/06/2017 is selected within this criteria.
Between Two Dates
You can specify a date range within a selection as in the following examples:
Example: Select everyone who has ran through our Review Campaign (ID 1214) on or after 25th August 2017
Table( ( CampaignSelection( ThruCampaignId = 1214 AND StepDate >= '2017-08-25' ) ), [Individual] )
Example: Select everyone who has ran through our Review Campaign (ID 1214) between 10th and 20th August
Table( ( CampaignSelection( ThruCampaignId = 1214 AND StepDate >= '2017-08-10' AND StepDate < '2017-08-20' ) ), [Individual] )
Between Two Times
To select between two times, adjust the syntax to just select where the stepdate is within your desired time range, such as below:
Example: Select everyone who has ran through our Review Campaign (ID 1214) between midday and 3pm on the 25th August
Table( ( CampaignSelection( ThruCampaignId = 1214 AND StepDate >= '2017-08-25T12:00:00' AND StepDate < '2017-08-25T15:00:01' ) ), [Individual] )
Within N Time Frame
Whilst there are occasions when you want to select within a specific date range for your selections, in a production campaign you may want to select within a rolling time frame, rather than a static one. To do this, you can use a combination of functions to calculate how many hours/days/months ago their campaign was. For example, in a live scheduled campaign, you may want to exclude anyone who has been through this same campaign within the last 6 months. This will allow you to build in your syntax to be variable, which you can then leave to calculate without any further intervention.
The main function to drive this calculation is a component called TIMESTAMPDIFF.
This component compares two dates and determines the time difference between them. This can be configured to look at a combination of time periods. From seconds, minutes and hours, to days, months, quarters and years, any range can be used in your calculation depending on your requirements.
The Core components to this are explained below:
"TIMESTAMPDIFF( SQL_TSI_DAY , StepDate , CURRENT_TIMESTAMP ) < 7"
-
TIMESTAMPDIFF - The component used to tell the system we will be comparing dates
-
SQL_TSI_DAY - The Timeframe interval we will be using, in this case days.
-
StepDate - the first Date to look at, in our case will be the StepDate
-
CURRENT_TIMESTAMP - The Date and Time at the point this component is used.
Combining this with the "< 7", means we are selecting all Step records which took place less than 7 days ago.
Example: Select everyone who has been on or ran through our Review Campaign (ID 1214) within the last 6 months
Table( ( CampaignSelection( ThruCampaignId = 1214 AND TIMESTAMPDIFF(SQL_TSI_MONTH , StepDate , CURRENT_TIMESTAMP) <= 6) ), [Individual] )
As mentioned above, this will select all historic records of a step taking place within your assigned time frame. This means it will look at all steps across a campaign, including audience and wait steps. In a lot of cases, you may only want to select people who have received a campaign or sent a communication within this date range. In this case, you would want to add additional criteria, to outline and select people who have ran through the communication step.
We will take our above syntax, and amend it slightly, so we are only looking at communications for the same selection:
Example: Select everyone who has been communicated to by our Review Campaign (ID 1214) within the last 6 months
Table( ( CampaignSelection( ThruCampaignId = 1214 AND TIMESTAMPDIFF(SQL_TSI_MONTH , StepDate , CURRENT_TIMESTAMP) <= 6 AND StepType = 'Communication' ) ), [Individual] )
With the addition of our above criteria for the StepType, we can now identify specific steps to include within our criteria.
Campaign Steps and Step Types
Within your Campaign history selections, you may want to select individuals who have gone through a particular route of a journey, or through a precise communication step. To do this, you can use a variety of Step and Step type selections to do just this.
To select the StepType, you can refer to either the Step Category or the Step ID in your query. This will allow you to distinguish a particular element within a campaign, for example:
Example: Select everyone who has gone through a Communication Step for our Welcome Campaign
Table( ( CampaignSelection( StepType = 'Communication' AND ThruCampaignName = 'Welcome Campaign' ) ), [Individual] )
Table( ( CampaignSelection( StepType = 3 AND ThruCampaignName = 'Welcome Campaign' ) ), [Individual] )
You can refer to our Communication step by either the Category name of 'Communication', or by the direct Step ID, which is 3.
For a full list of the Step Types, Categories and their IDs, see below:
| Step Category | Step ID | Description |
|---|---|---|
| Audience | 1 | Audience Element to load records into a Campaign |
| Merge | 2 | Merges two customer paths into one |
| Communication | 3 | Step to Send out communications / Output data |
| SplitVolume | 4 | Volume Split of your Data |
| SplitYesNo | 5 | Splits data based on the Yes/No query element |
| SplitResponse | 7 | Splits records depending on the response (CTA - Call to Action) |
| Wait | 8 | Wait steps to pause records from continuing on a campaign journey |
| SeedList | 9 | Includes seeds in a campaign |
| Dedupe | 11 | Dedupes records based on a specific field |
| Exit | 12 | Exits records through a campaign |
| SplitFieldValue | 13 | Uses the field split Element |
| SplitQueryList | 14 | Uses the Query Split Element |
| Control | 16 | Control Group step |
| Tag | 17 | Tags data through this step |
| SplitDynamic | 18 | A dynamic split based on advanced analysis (Tags / Modelling) |
| Integration | 19 | Integration (API Call) Step type |
| JoinOut | 20 | Makes leads available to import to another campaign via a JoinIn step |
| JoinIn | 21 | Pulls leads into a campaign from another campaign's JoinOut step |
Step Selection - ThruStepID and OnStepID
Within a campaign, you may have many of the same step type. In this case for example, it can be difficult to select a specific communication node if there are 3 in one campaign. In these occasions, the syntax to select a specific step by their ID come in use:
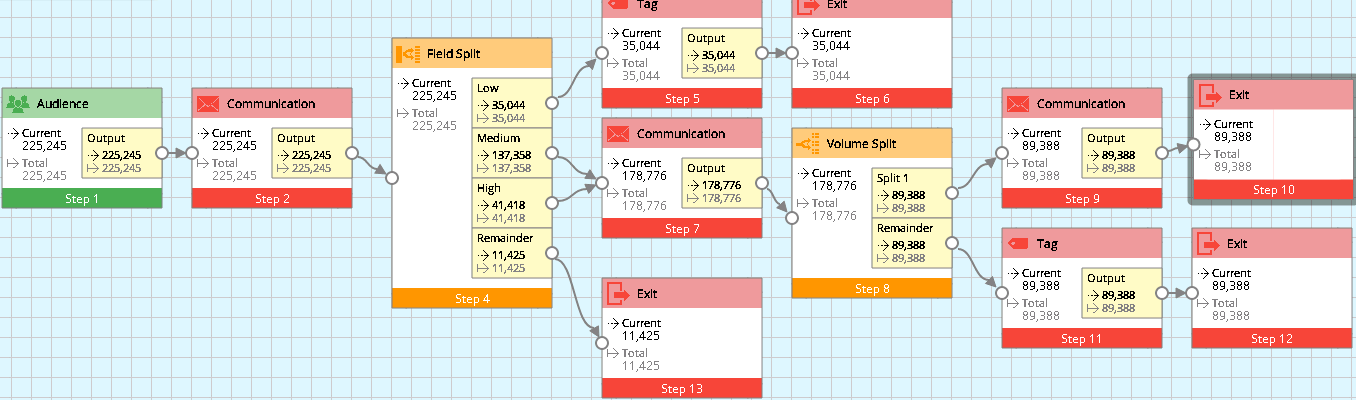
In the above Welcome campaign, there are multiple communication steps, so using the above syntax of StepType = 3 would select all of those communication steps. Taking Step 7 as our focal selection, of 178,776 records, we need to select specifically from this, rather than all communication steps.
Instead of using StepTypes, you can select records to find those have passed through a specific step, using ThruStepID and OnStepID. These two functions can be created using the usual Selection Nodes.
ThruStepID
Using the WelcomeTest Campaign, you can select anyone who has gone through the campaign and Step 7 (the required Communication step).
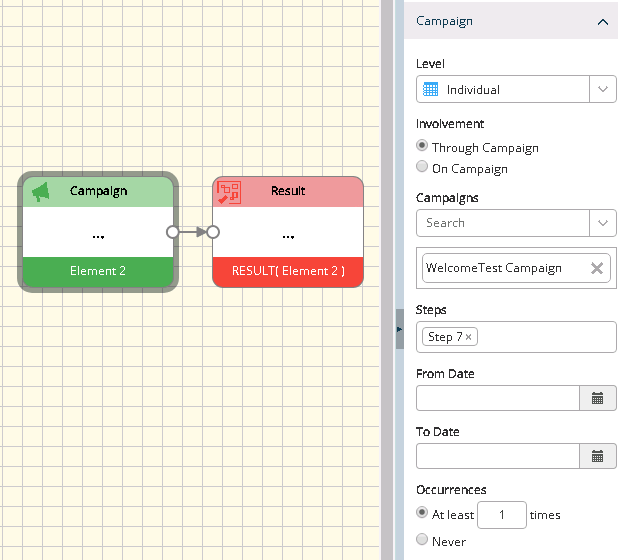

The above selects the WelcomeTest campaign, and selects anyone who has gone through Step 7. The is echoed by the syntax, which selects everyone who has gone through CampaignID 1222, and has gone through Step 7.
With the syntax ThruStepID as the name suggests, it has selected all records who have passed through this step.
OnStepID
As the name suggests, OnStepID as a function will allow you to select records who are currently waiting on a specific step, rather than records who have passed through one as ThruStepID would suggest.
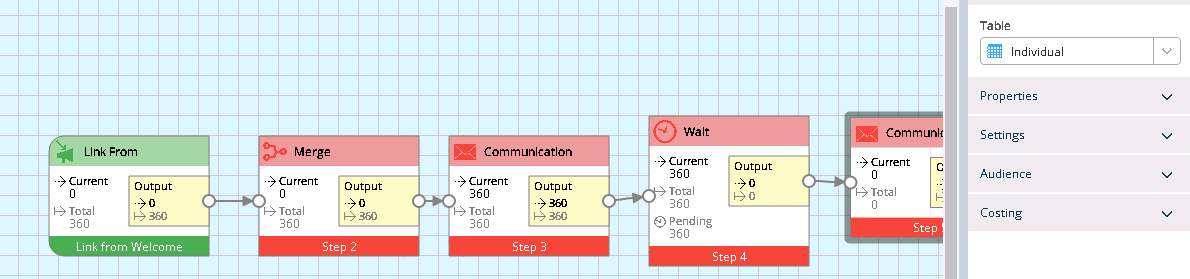
As with the above campaign, as Stage 2 of our Welcome Campaign, we have 360 records currently pending on a wait step, waiting to be sent a follow up email.
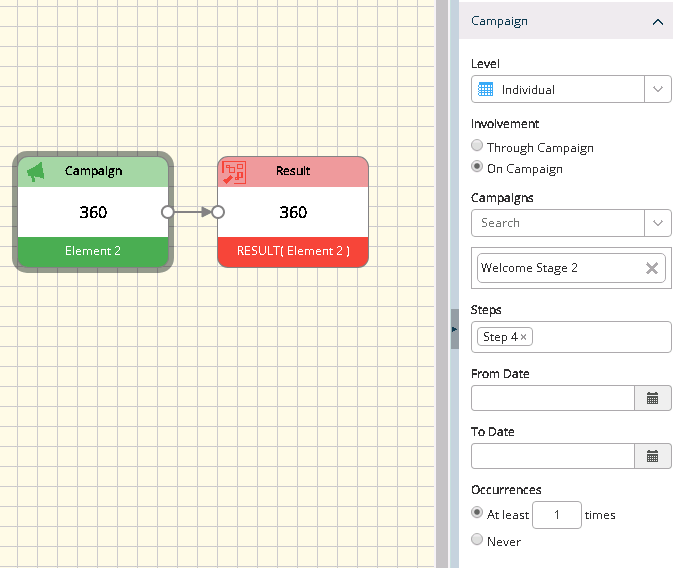
The above example selects everyone on Step 4 (which is the wait step) for that campaign, which returns 360 records.
The syntax is displayed in the Editor tab.

The criteria selects the Campaign where OnCampaignID = 1229 (selecting records who are currently still ON that campaign, rather than through). The second selection is where OnStepID = 4, which selects all records who are currently waiting on Step ID 4.
Response Types and IDs
As well as different campaign steps, you can refer to any campaign history response also, to select a particular Response Event (such as an open or click) within your criteria. Rather than be fed from BlueVenn, these Response events are fed directly from the Connector downstream.
To select these, the response can be selected either by the Name, or the ID, eg:
Table( CampaignSelection ( ResponseType = 'Click' , [Individual] )
Table( CampaignSelection ( ResponseType = 2 , [Individual] )
| Response Type | ID | Description |
|---|---|---|
| Unknown | 0 | Unknown Response Type |
| Open | 1 | Email was Opened |
| Click | 2 | Email link Click |
| PageView | 3 | Web Page viewed from click |
| HardBounce | 4 | Email Hard Bounce, SMS send failure etc. |
| SoftBounce | 5 | Email Soft Bounce |
| ReportedAsSpam | 6 | Email was reported as spam |
| Conversion | 7 | Communication produced a conversion |
| Message | 8 | ResponseType of Message |
| Unsubscribed | 9 | Lead was unsubscribed |
| Forward | 10 | Communication was forwarded |
| Reply | 11 | Lead replied to communication |
| UniqueOpen | 12 | Unique open - first campaign open per person only |
| UniqueClick | 13 | Unique click - first campaign click per person only |
| Send | 14 | Campaign sent - this is not strictly a response, but rather used in the response type for campaign execution summary |
Selecting by Campaign Channels
Some selections, particularly rules for frequency suppressions, may only want to look at particular output channels. For example, with a frequency rule, you may want to suppress contacts so they only receive a certain amount of communications per week. However, if a contact was included in a Brochure DM that week also, that may not be relevant for an email suppression.
The function "ChannelCode" allows you to refine your campaign history selection to a specific output type.
These examples show the Channel syntax needed to select records from the Individual table, who have been output via each channel. These will need to be customised to include your campaign level if required, or a specific campaign ID.
| Channel | ChannelID | Syntax |
|---|---|---|
| No Channel | 0 | Table( CampaignSelection ( ChannelCode = 0) , [Individual] ) |
| TextFile | 1 | Table( CampaignSelection ( ChannelCode = 1 ) , [Individual] ) |
| DotMailer Email | 2 | Table( CampaignSelection ( ChannelCode = 2 ) , [Individual] ) |
| FTP | 3 | Table( CampaignSelection ( ChannelCode = 3 ) , [Individual] ) |
| FreshRelevance | 4 | Table( CampaignSelection ( ChannelCode = 4 ) , [Individual] ) |
| SalesForce Marketing Cloud | 5 | Table( CampaignSelection ( ChannelCode = 5 ) , [Individual] ) |
|
IBM Marketing Cloud(Silverpop Email) |
6 | Table( CampaignSelection ( ChannelCode = 6 ) , [Individual] ) |
| Dotmailer SMS | 7 | Table( CampaignSelection ( ChannelCode = 7 ) , [Individual] ) |
| Twitter API | 8 | Table( CampaignSelection ( ChannelCode = 8 ) , [Individual] ) |
| GiveX Points | 10 | Table( CampaignSelection ( ChannelCode = 10 ) , [Individual] ) |
| Instiller Email | 11 | Table( CampaignSelection ( ChannelCode = 11 ) , [Individual] ) |
| Adestra Email | 12 | Table( CampaignSelection ( ChannelCode = 12 ) , [Individual] ) |
| MailChimp Email | 13 | Table( CampaignSelection ( ChannelCode = 13 ) , [Individual] ) |
| Pure360 Email | 14 | Table( CampaignSelection ( ChannelCode = 14 ) , [Individual] ) |
| CheetahMail Email | 15 | Table( CampaignSelection ( ChannelCode = 15 ) , [Individual] ) |
| Facebook API | 16 | Table( CampaignSelection ( ChannelCode = 16 ) , [Individual] ) |
| Responsys Email | 17 | Table( CampaignSelection ( ChannelCode = 17 ) , [Individual] ) |
| HubSpot | 18 | Table( CampaignSelection ( ChannelCode = 18 ) , [Individual] ) |
| Twilio SMS | 19 | Table( CampaignSelection ( ChannelCode = 19 ) , [Individual] ) |
| Salesforce DMP | 21 | Table( CampaignSelection ( ChannelCode = 21 ) , [Individual] ) |
| Amazon S3 | 22 | Table( CampaignSelection ( ChannelCode = 22 ) , [Individual] ) |
| TextLocal SMS | 23 | Table( CampaignSelection ( ChannelCode = 23 ) , [Individual] ) |
Custom Campaign Codes
Within BlueVenn, you can create your own custom marketing codes for your campaigns. You can assign unique values to your business and campaigns, to pull back at a later date.
Once these have been set up and used, you can use these within your campaign history to call back any communications which match your specific code.
In our example, we have used 3 of our 5 brand codes:
- PromoCode is the amount of discount we are offering (if we were sending a promotional code).
- CampaignType is reasoning for the Communication, whether it's a promotion, a research/survey type communication, or a Operational Transaction communication for an existing purchase.
- BrandType relates to whether you are promoting Luxury products, or the basic Essentials range.
| ID | Step ID | ||||
|---|---|---|---|---|---|
| StepCode1 | StepCode2 | Stepcode3 | Stepcode4 | Stepcode5 | |
| PromoCode | CampaignType | BrandType | |||
| 1 | 10% Discount | Marketing | Luxury | - | - |
| 2 | 15% Discount | Research | Essentials | - | - |
| 3 | 20% Discount | Transactional | - | - | - |
| 4 | 25% Discount | - | - | - | - |
| 5 | BOGOF | - | - | - | - |
| 6 | 3for2 | - | - | - | - |
The above is stored in the system, which you can pull into any campaign you output. These can be also selected in any combination. For example if you were sending a Promotional Campaign to push a 20% Discount on Luxury Brand products, you would select those respectively from dropdowns in the campaign:
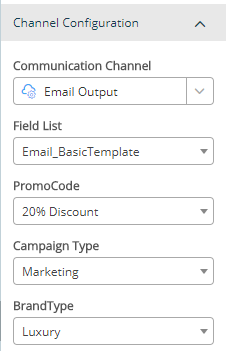
These are all stored and the needed IDs can be retrieved in a campaign history selection, as shown below. These will use the new function, StepCode
Example: Select everyone who has been communicated to by promo campaign (ID 1236) who were sent a 20% Discount campaign, Marketing the Luxury brand:
Table( ( CampaignSelection( ThruCampaignId = 1236 AND StepCode1 = 3 AND StepCode2 = 1 AND StepCode3 = 1 ) ), [Individual] )
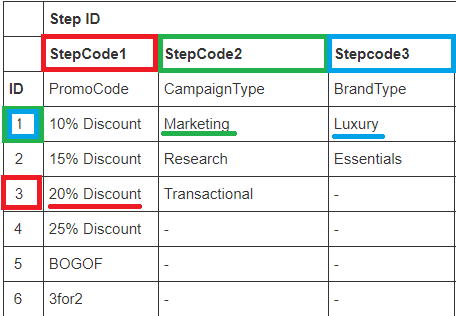
As with the above, the Grid reference was used to select where:
- StepCode1 (PromoCode) is equal to ID 3 (20% discount) - Red
- StepCode2 (CampaignType) is equal to ID 1 (Marketing) - Green
- StepCode3 (BrandType) is Equal to ID 1 (Luxury) - Blue
As highlighted below:
Control Groups
When running campaigns, you may want to restrict the communication by applying control groups to your campaigns.
Once your records have been applied to a control group, you may want to select those records, to monitor their behaviour outside of the campaign. This can be done using Control Group Syntax:
isControl<n> = TRUE
There are up to four control groups available within each campaign. You have the option to select from each of the 4 Control groups in isolation, by defining which control group you want to select from:
- isControl1 = TRUE
- isControl2 = TRUE
- isControl3 = TRUE
- isControl4 = TRUE
You can apply the above examples to a Control Group Check campaign, to monitor the effectiveness of the emails. In the campaign below a 10% segment of the audience is used to monitor Audience purchases vs Control Purchases.
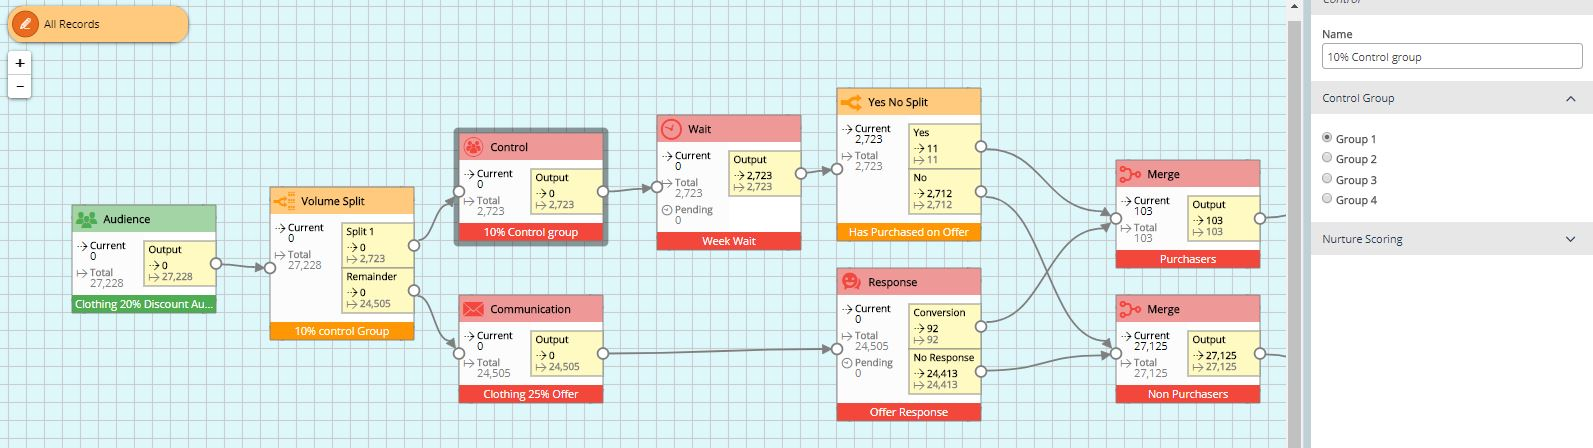
There were 2,723 records in the Control group, which is assigned to Control Group 1. Use the following syntax to select these 2,723 records:
Table( CampaignSelection ( OnCampaignName = 'Control Group Check' and isControl1 = TRUE ) , [Individual] )

You can also go a step further in using this syntax, to find purchasers depending on if they were in the control group or not.
There were 92 Conversions from the Campaign Audience, and 11 Purchases from the Control Group, totaling 103 Customers from this promotion.
To select all 103 Purchasers, use a Campaign Selection to select records on this particular campaign who have gone through the Purchasers node (Step 8):

To be more specific and select the 11 Control group Purchasers, you can include IsControl1 = TRUE syntax, to select those who were fed through our Control Group:

Or, you can use the negative for this selection to select everyone who was not in the Control Group. This gives 92 customers who received the campaign. This can be used by inserting the syntax as "isControl1 = FALSE"

While isControl1 was used in the examples, you could use any of the 4 selected control groups.